Connect to Oracle Database
Oracle database can be used as a dynamic data source for Label Objects
Open the Dynamic Data Manager. This dialog enables the user to manageDynamic Data Sources for label
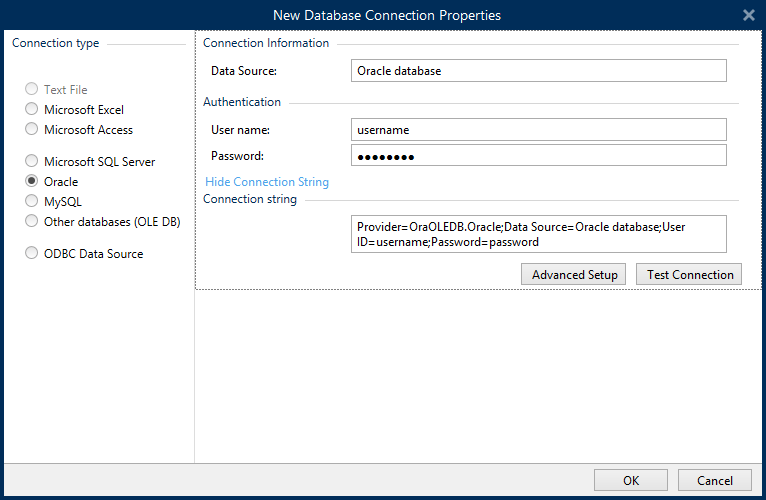
Click your Database Connections button in the Dynamic Data Manager Ribbon and select Oracle as the preferred database type. New database connection properties window opens.
Note
To connect to Oracle database and use the data in Loftware software, you must first install and configure the Oracle client software on each computer with installed Loftware. For more information, see Connecting to Oracle 19c database.
Step 1: Connection Setup
Connection type group allows you to define the type of database connection.
Connection Information group defines database file details.
Server: defines the database server to be used for the connection. The available servers are listed automatically. To add a non-listed server, insert its name or location manually.
Authentication group selects user authentication type.
Use Windows authentication: login using your Windows domain credential.
Use SQL Server authentication: login using SQL server credentials.
Database selection selects the database on the previously selected server. This database is going to be used as a data source for the selected label
Database defines the server database to connect to.
Show Connection String displays the current database connection string and allows it to be inserted or modified.
Warning
Connection string editing is intended for advanced users only. To configure the database connection, users are encouraged to use standard dialog inputs in the dialog box.
Test Connection button starts a connection testing procedure. It shows if your connection with the database has been established successfully. A confirmation or error message appears depending on the connection status.

Click OK when done. Database properties window appears.
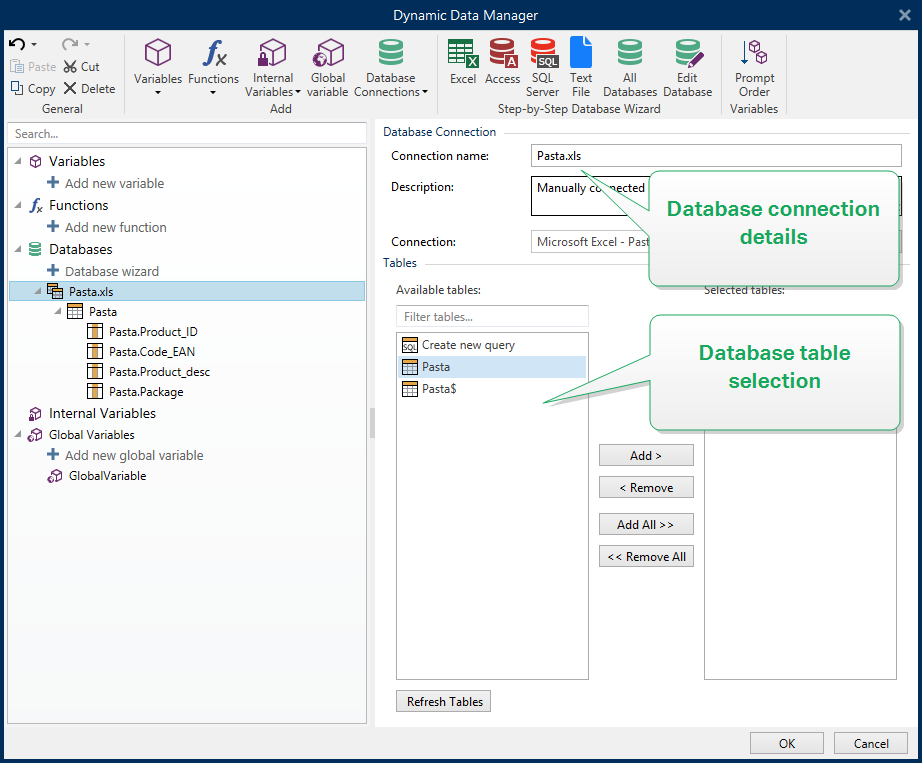
Database Connection group defines the connection name and describes it.
Connection name: defines the name for the connected database file. By default, it displays the filename of the connected file. Insert a new name to make it easy to be found in the Desktop DesignerDynamic Data Explorer.
Description: allows adding additional information and suggestions for the connected database.
Connection: identifies the currently connected database file. To replace the currently connected file, click the Connection Setup button. New Database Connection Properties window reappears – repeat step 1 to connect to an alternative database file.

Step 2: Database Table Selection
Click OK when done.
Tables group allows you to select which tables of the connected database should be used as a data source.
Available tables: available tables in the selected database.
Selected tables: tables that are used as a data source.
Click Add > or < Remove buttons to add or remove the tables from the Selected fields.
Note
When editing an existing database, a table cannot be removed if used in a script, function, action, or connected to a label
Step 3: Configure connected database
Read about how to configure the connected table Database Table Configuration
Read about how to configure the database fields Database Field Configuration
Click OK when done.