Connect to Other Databases (OLE DB)
Various types of databases can be connected to Label Objects
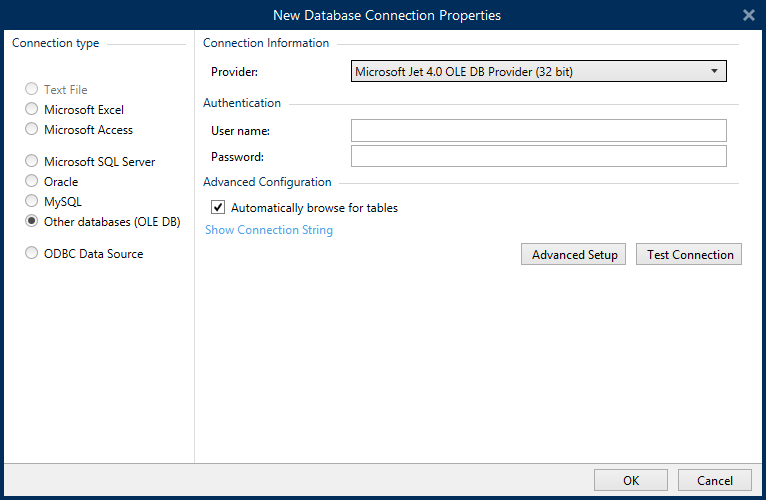
Clic your Database Connections button in the Dynamic Data Manager Ribbon and select Other Databases (OLE DB) as the preferred database type. New database connection properties window opens.
OLE DB extracts data from a variety of OLE DB-compliant relational databases by using a database table, a view, or an SQL command.
Example
OLE DB can extract data from tables in Microsoft Access or SQL Server databases.
To manually connect an object to other databases via OLE DB, complete the below-listed steps:
Step 1: Connection Setup
Connection type group allows you to define the type of database connection.
Connection Information group defines database details.
Provider: defines the provider to be used for accessing the data by exposing the OLE DB interfaces.
Authentication provides the user name and password for establishing the connection.
Test Connection button starts a connection testing procedure. It checks if Desktop Designer can successfully connect to the database.

Advanced Configuration options are:
Automatically browse for tables (selected by default) automatically displays the available OLE database tables. Cleared checkbox skips this step.
Show Connection String displays the current database connection string and allows it to be inserted or modified.
Warning
Connection string editing is intended for advanced users only. To configure the database connection, users are encouraged to use standard inputs or Advanced Setup dialog.
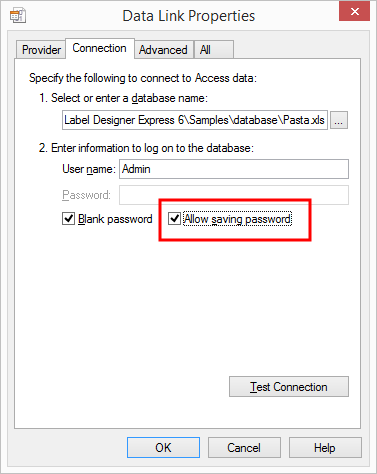
Advanced Setup button opens the Data Link Properties window allowing the user to define the connection properties. Data Link Properties is a Windows system dialog – read more about its properties here.

Note
When connecting to a password-protected database, make sure the Allow saving password option is selected. If not, even after a successful Test Connection procedure, database access is not going to be granted.
Test Connection button starts a connection testing procedure to confirm if a connection with your database has been established successfully. A confirmation or error message appears.
Click OK. Database properties window appears.
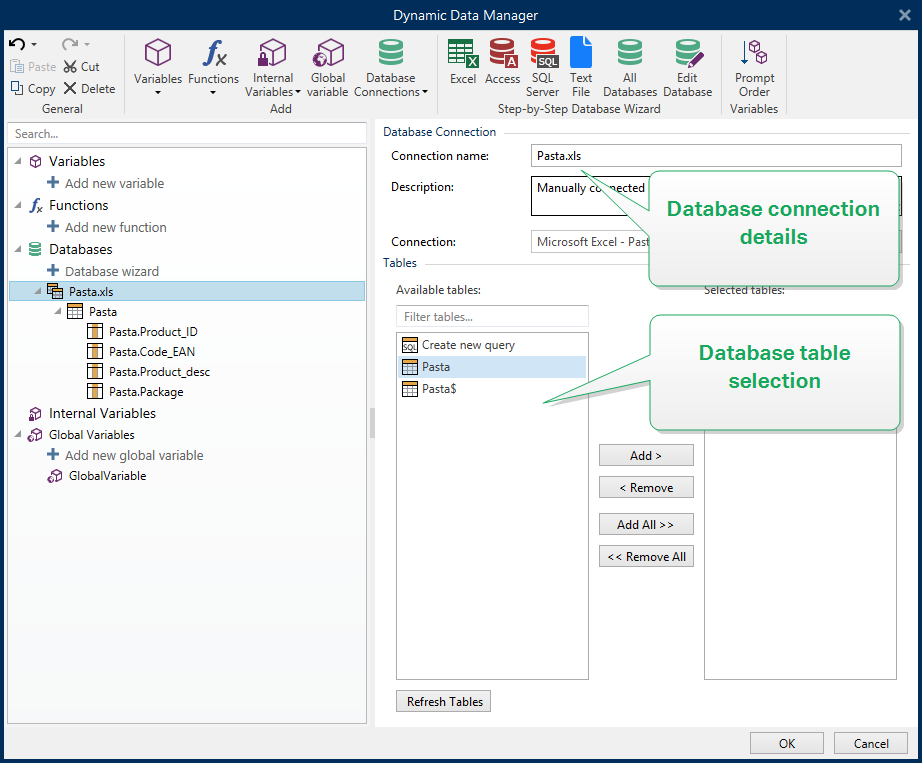
Database Connection group defines the connection name and describes it.
Connection name: defines the name for the connected database file. By default, it displays the filename of the connected file. Insert a new name to make it easy to be found in the Desktop DesignerDynamic Data Explorer.
Description: allows adding additional information and suggestions for the connected database.
Connection: identifies the currently connected database file. To replace the currently connected file, click the Connection Setup button. New Database Connection Properties window reappears – repeat step 1 to connect to an alternative database file.

Step 2: Database Table Selection
Click OK when done.
Tables group allows you to select which tables of the connected database should be used as a data source.
Available tables: available tables in the selected database.
Selected tables: tables that are used as a data source.
Click Add > or < Remove buttons to add or remove the tables from the Selected fields.
Note
When editing an existing database, a table cannot be removed if used in a script, function, action, or connected to a label
Step 3: Configuration of Database Tables and Fields
Read about how to configure the connected table Database Table Configuration
Read about how to configure the database fields Database Field Configuration
Click OK when done.