 Add a Table
You can use a Table control to display the results of a data source query, action, rule, or business rule in an application in Applications
To add a Table control to a data entry form, use this procedure.
- From the Controls group in the Insert tab, click and drag Table to the Form view of a label template or to a form.
- In the Properties panel, change the Name to a meaningful name.
Note: A Name, Data Ref, or Input Data Ref can include letters and numbers. Additionally, the following characters are permitted but cannot begin the name: hyphens, underscores, and periods.
- For the Source Data Ref field in the Table section, enter the location in the data map from which the columns obtain data.
Example
/MyData
Important! If an application user selects a data value that is later deleted from the data map, that value may still be displayed to the user when the data source is queried even though it no longer exists. It is recommended that a Designer configure applications and rules to either clear out values that have been deleted or else restore necessary values to the data map.
- Enter a Style Data Ref if you have defined a shared style for your tables with a business rule.
- For the Column Count property, modify the value to add or remove columns in the table as needed.
Tip: If you want the number of columns in the table to be determined from the data source, set the Column Count to 0.
- Decide whether the envelope
 In the Label view or Form view in Label Design, a blue box that outlines a field when the field is selected. of the table should automatically resize based on row height and column width or if the envelope should be a fixed size, then do one of the following:Automatically resize the envelope of the table
- In the Envelope section of the Home tab, select the Auto Envelope check box.
- Adjust the values in the Row Height and Row Count properties as needed.
Set a fixed size for the envelope of the table- In the Envelope section of the Home tab, clear the Auto Envelope check box.
- In the Arrange section, adjust the values in the Width and Height fields as needed.
- To add a search toolbar to the table, in the Properties panel select Show Search.
- To display the number of each row, select Show Row Numbers. Row numbers are displayed in Print

- To modify the fill color of alternating rows, modify the values in the Style group of the Home tab.
- To configure the columns of your table, in the View tab, click Table Columns. Do the following for each column in the table:
Note: If your Column Count is 0, skip this step.
- Select the row of the column you want to configure and then click Edit
 . The Edit column dialog box for the column is displayed.
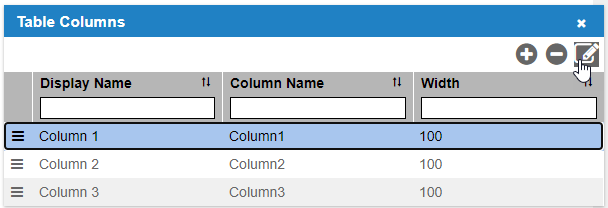
- Under Header Properties, enter text for the header Display Name or leave this field blank to use the name as defined in the data source.
- Under Column Properties, enter the name of the column as defined in the data source for the Column Name.
- Optional: Modify the column Width and any additional header and column properties. For more information, see Columns and Table Rules.
- Select the row of the column you want to configure and then click Edit
- Optional: Configure rules for the table and for specific columns. For more information, see Configure Table Rules.
- To style the table using a business rule, in the Style Data Ref field, enter the location in the data map from which the columns obtain styling data, and then add a trigger on the form to run the business rule with the onLoad event. For more information, see Style a Table.
Note: Styles defined by a Style Data Ref override the styles configured in the Columns and Table Rules pane.
- View the populated and styled table in Applications
A table is displayed in an application in Applications
- If the table data is populated by a business rule, add a trigger on the form to run the business rule with the onLoad event.
- Open or create an application and add the form to the application.
- In Applications
- If a column is sortable, you can click the column header to sort the table by that column in ascending or descending order.
- To change the displayed order of a columns, click and drag the column in the table.
Note: If a table cell is editable, editing the cell modifies the data map entry but does not modify the data in the data source.
Configure Functionality
You can configure more functionality for the control, such as running data source queries or rules, dynamically displaying or hiding the control, dynamically enabling or disabling the control, and associating the control with data.
- Select Data Source Queries and Rules to Run
- Configure the Running Order for Queries and Rules
- Dynamically Manage If a Control Is Displayed
- Dynamically Manage If a Control Is Enabled
- Dynamically Manage the Tab Order of a Control
- Associate the Control Output with a Field in a Label
Best Practice
Save the label template or form immediately after configuring a control.