Rich Text Box
Rich text box (RTF) is an object for rich text editing. It encloses textual content with hyperlinks, line images, and other formatting created using an internal Desktop Designer's word processor.
Source
Connected data source defines the content source of the selected object.
Fixed data: manually entered fixed text.
Variables predefined variable values which are used as object content.
Functions input data transformation tools.
Databases database values which are used as object content.
Counter displays counter value on the label.
The content field allows you to type the object content.
Rich Text Box Editor is a full-scale text processor.
Edit content button opens the editor.
Supported actions in Rich Text Box Editor:
Text formatting
Content find and replace
Inserting of images, symbols, tables, and dynamic data sources
Content zooming
Show RTF code option displays the RTF code.
Tip
Read more about the available Rich Text Box Editor features.
Style
Rendering group defines the active rendering method for the rich text content. If you experience difficulties while importing formatted text to the Rich text box object, switch to Alternative rendering. This helps you achieve correct content formatting on the printed labels.
Note
Alternative rendering adds support for right-to-left scripts.
Note
If you are editing legacy Loftware label files (.lbl), Alternative rendering is automatically active.
Note
If you are designing labels with custom fonts, Alternative rendering is the preferred option.
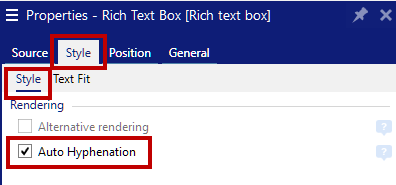
Auto Hyphenation. To maximize label space utilization, you can automate hyphenation for multi-language text within Rich Text Objects (RTF). This option enables grammatically accurate word breaks (‘-‘ characters) according to language-specific hyphenation rules.
Note
RTF objects have hyphenation disabled by default. You can enable hyphenation in the RTF object’s properties.
To enable hyphenation in RTF, go to RTF Properties > Style tab > Style and enable the Auto Hyphenation check box.

Dictionary integrations
You can download dictionaries from OpenOffice Extensions or LibreOffice Dictionaries.
To import custom dictionaries, create a folder structure /System/Dictionaries in Documents. Dictionary files must follow the naming convention: hyph_[language]_[region].dic (e.g., hyph_en_CA.dic).
You can load multiple dictionaries for the same language; the language identifier must follow the "[language]_[region]" format.
Note
Custom dictionaries override built-in dictionaries.
If a file with the same name exists in Documents, it supersedes any built-in dictionary for RTF objects.
Supported Languages
Multi-Language Hyphenation supports the following languages:
Bulgarian (BG), Czech (CS), Danish (DA), German (DE), Greek (EL), English (EN), Spanish (ES), Estonian (ET), French (FR), Croatian (HR), Hungarian (HU), Italian (IT), Lithuanian (LT), Latvian (LV), Dutch (NL), Norwegian (NO), Polish (PL), Portuguese (PT), Romanian (RO), Serbo-Croatian (SH), Slovak (SK), Slovenian (SL), Serbian (SR), Swedish (SV), Ukrainian (UK), Chinese Simplified (ZF), Chinese Traditional (ZH), Finnish (FI), Turkish (TR)
Only one dictionary file per language is permitted when replacing built-in dictionaries.
Language Detection in Loftware Automation
Automation processes RTF content containing multiple languages, identifying language sections using embedded identifiers.
Example
An RTF object prints hazard warnings in English, German, and French. Automation detects the language of each segment and applies the correct hyphenation rules per language.
RTF inputs are raw RTF code; Automation applies formatting during concatenation, preserving style (e.g., bold text).
Languages within RTF code are marked using the \lang tag, followed by the LCID (Locale ID).
Example
• \lang1033: English (United States)
• \lang1031: German (Germany)
• \lang1060: Slovenian
Text Fit
None makes Text box size and font non-adaptable.
None: non-adaptable Rich Text box size and font.
Note
If the content amount exceeds the object size, an error message appears. The label is not printed. To suppress such error and print the text box, enable Ignore excessive content.
Adjust height to fit content: automatic Rich Text box height adaptation.
Fit content by adjusting font size: adaptable font size.
Minimum size: minimum font size.
Maximum size: maximum font size.
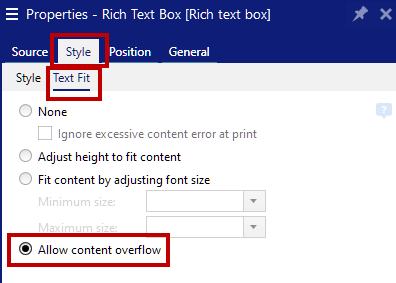
Allow content overflow: To meet compliance with CLP regulation warning message requirements, you can enable text overflow of formatted multi-language content across multiple pages within label templates.
With this option, you can:
Enable the design of multi-page documents where RTF objects allow text to overflow from one page to the next, based on the volume of data submitted in a print request.
Organize the content within RTF objects using columns (functionality already available).
Maintain consistent size and placement of the RTF object across all printed pages.
Support multiple RTF objects per label, each independently configurable for multi-page overflow.
Allow for scenarios where individual RTF objects on the same label may overflow to different numbers of pages (e.g., one object overflows to two pages, another to three pages).
Ensure printing for all printer types, including physical printers using Windows drivers and PDF virtual printers.
Support printing both rolls of labels and letter-sized pages.
To enable Multi-Page Text Overflow in RTF, go to RTF Properties > Style tab > Text Fit and enable the Allow content overflow radio button.

Note
With this option enabled:
Text Fit options are automatically disabled.
Double-sided printing is not supported.
Position
Position tab defines object positioning and its position-related behavior.
Position group defines the object's position.
X and Y: anchoring point coordinates.
Size group sets the object's dimensions:
Width and Height: horizontal and vertical object dimension.
Keep aspect ratio: simultaneous changing of object dimensions while scaling.
Note
If the measurement unit is changed in Label Properties, the value transforms automatically.
Rotation angle is the object angle according to the design surface.
Tip
There are multiple ways to set the object's angle: enter the angle manually, drag the slider or click and drag the 

Anchoring point is the spot where an object is pinned to design surface. Variable size objects increase or decrease their size in the direction that is opposite to the chosen anchoring point.
Lock prevents the object from being moved during the design process.
Relative Position
Relative Position options define the position of an object when label size or positions of neighboring objects are changing during the label design process.
Enable horizontal relative position: activates horizontal relative positioning.
Relative to label border: the position of object is defined relative to the reference label border. Define horizontal offset for the object with regard to this border.
Relative to another object: the position of object is defined relative to the border of a neighboring object. Define horizontal offset for the object with regard to this object.
Object: selects the reference object for horizontal relative positioning.
Border: neighboring object's reference border or label border (if there are no other objects on the label) for horizontal relative positioning.
Offset: horizontal distance from label border or reference object's anchoring point.
Enable vertical relative position: activates vertical relative positioning.
Relative to label border: the position of object is defined relative to the reference label border. Define vertical offset for the object with regard to this border.
Relative to another object: the position of object is defined relative to the border of a neighboring object. Define vertical offset for the object with regard to this object.
Object: selects the reference object for vertical relative positioning.
Border: neighboring object's reference border or label border (if there are no other objects on the label) for vertical relative positioning.
Offset: vertical distance from label border or reference object's anchoring point.
Note
Object position changes if label size or position of the related object change.
When designing double-sided labels, you can also take objects on the opposite side of the label as reference objects for relative positioning. In this case, objects on opposite sides move together if you change their positions.
Note
Label sides of reference objects are clearly identified on the Object selection list with (Front Side) and (Back Side).
General
General tab identifies the object and sets its status.
Name sets a unique object ID.
Note
Avoid using spaces or special characters in object names.
Description allows adding notes and annotations for an object. It provides help during the label design process.
Status group defines object visibility on print preview and on printed labels.
Not printable: prevents the object from being printed. The object still remains visible on the print preview and affects other objects in relative positioning. This option is useful when printing on predesigned or stock-specific labels.
Visible: if the checkbox is not selected, the object neither appears on the print preview nor on the printed label. The object is treated as if it does not exist.
Condition: makes an object enabled (editable) if the result of the given condition is "True". This setting defines object visibility on form startup and when the connected variable's value changes.
Tip
Equals (=) and slashed equals (≠) signs are allowed to be used in object visibility condition. Click the Equal/Not equal button select the appropriate sign type.
Not printable (selected) | YES | NO | YES |
Visible (cleared) | NO | NO | NO |