Creating and Sharing Applications
With

Creating New Applications
To create your new Application and configure general
Go to the Control Center
Applications tab, and clickAdd .Enter a
Name for your Application. Give your new shared Application a meaningful name to make it easier to identify later.Enter your
Description . Explain the purpose of your Application.Select your
Application type . You can choose to open:Single solution or label file Folder with one or more solution or label files With this option selected, you don't need to create separate Applications for each file in your folder. You can add or remove label templates from your folder.
Warning
Applications don't work with dynamic values (
Remember the last used value option). Use workarounds instead, for example, write and read variable values to your database.Under
Path , clickBrowse and navigate to your label template, Solution, or folder stored in your Control CenterDocuments .You can also type the file path directly. Begin your relative file path with a slash: (/).
/Labels/Test_label.nlbl
If your label or solution file uses a file database connection (with Microsoft Excel or Access database), read Using Local Databases in Applications to ensure the accessibility of your data.
Your next step is to define the Application's
Defining Application's Authorised Users and Groups
Define your authorized users and groups to restrict access to your shared Applications and make your labeling environment more secure.

Tip
You can skip this part and add your users later.
Defining Loftware Cloud Authorized Users and Groups
Define your
Existing users: In
Applications >Applications clickAdd .Create New Web Applications page opens.In the
Authorized Users and groups section clickAdd . TheAdd Users to your Authorized List for the New Application dialog opens.Use the
Search users field to type your selection. You can also narrow your search by Type using the drop-down list, or invite new Guest users.If your company uses the Azure Active Directory, you can either select specific
Organizational users orOrganizational groups . To open your shared Application, all included users must authenticate themselves using their work-account credentials.Click
Add .
Invite new guest users In
Applications >Applications clickAdd .Create New Web Applications page opens.In the
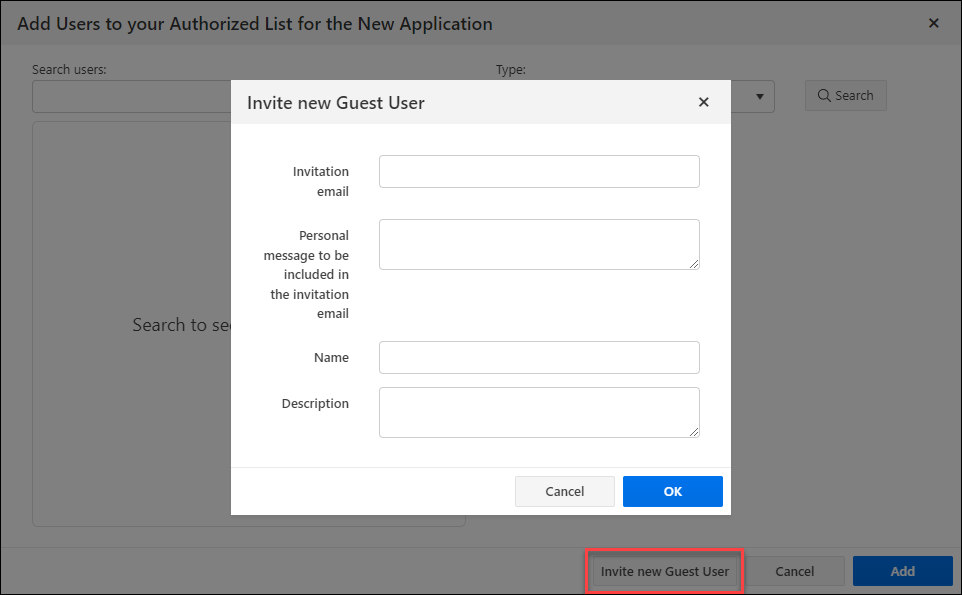
Authorized Users and groups section clickAdd . TheAdd Users to your Authorized List for the New Application dialog opens.Click
Invite New Guest User to share your Application with individual users or with users that are not listed under your company's Organizational users or groups.Enter an
Invitation email address, aPersonal message to your user, the user'sName , and aDescription of your user for internal use.
Click
OK . Your new Guest user receives the invitation email for your shared Application.Click
Add .
Note
Your invited Guest users must click the link in the received invitation email. The link takes the invited users to the Loftware Cloud sign-up page. After they complete the sign-up procedure, they can start using your shared Application.
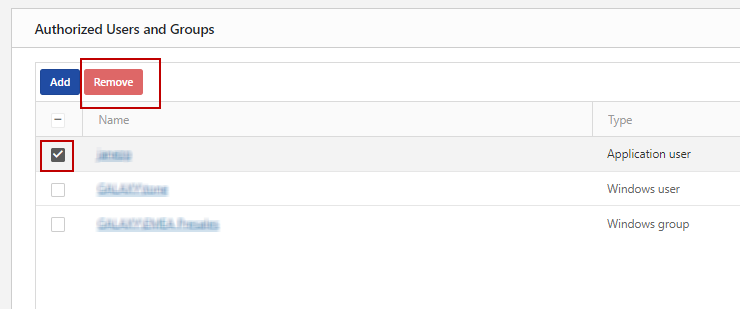
Your added users or groups are now listed among the

To restrict access to your shared Applications, you can later remove your added users or groups from the
Defining Authorized Users and Groups for multiple users
In certain cases, you want to assign your Application to a list of Windows users. To speed up the process of adding multiple users, list these users in a table and manually add them to your shared Application:
In
Applications >Applications clickAdd .Create New Web Applications page opens.In the
Authorized Users and Groups section clickAdd . TheAdd Users to your Authorized List for the New Application dialog opens.Click the
Add Users or Groups Manually link. A dialog opens.Under
Type , select if you want add Windows users or groups. .Paste or enter your users, each in a separate line.
Click
OK .Click
Add .
Your added users or groups are now listed among the
To restrict access to your shared Applications, you can later remove your added users or groups from the

Configuring Application's User Settings
Configure your user settings to:
Customize and track your printing activities.
Limit who can access your Applications and how many printers (Licensed printers) they can use.

Configure
In
Applications >Applications clickAdd .Create New Web Applications page opens.Navigate to the User Settings section.
Under
Status toggle betweenActive orSuspended .Your applications are
Active by default. This means that your users can start working with them immediately. If you want to prevent the usage of your Application, set the status toSuspended . This is useful during your testing phase or if you wish to postpone the use of your Application.Under
Record printing activities to the history log toggle betweenOn andOff .Record printing activities to history log keeps track of user printing actions within your shared Application. This option allows you to start or stop the recording of printing activities in Control Center.See the recorded activities on the Control Center History page.
Note
Recorded information items are: label name, label quantity, printer name, variable values, etc.
Restrict your Application logins and printer usage:
Web Printing gives you Application access control and allows you to limit the number of used printers for your shared Application.
Allowed IP addresses enables you to give access to your Application's login only to computers with certain IP addresses. Your shared Application blocks computers with non-defined IP addresses. Enter each address in a separate row, or separate them with a semicolon (;). To specify your address range, use CIDR notation. You can convert subnet mask notation into CIDR notation using online calculators.Example
Defining a range of permitted IP addressesTo allow login from any IP in range 192.168.0.1–192.168.0.254, define the range as 192.168.0.0/24.
To
Enable printer limitation toggle betweenOn orOff . WhenOn , define theNumber of printers your Application users are allowed to print on.Warning
Each printer used in your shared Application takes one Licensed printers. This setting makes sure you don't accidentally run out of available printer licenses that come with your Loftware license.
Number of printers is the maximum number of allowed printers per user for your Web Application. If users exceed this number, they can no longer print to additional printers.
Under
Variable values , you predefine values for custom variables for your shared label or solution file.Variable values are commonly used for predefining Application (Solution) languages or settings, or label template active layers.
Example: Language as a variable
For example, users from two different regions use the same Application simultaneously. Users from the first location need the Application in the French language, while users from the second location need their version in the German language.
While each region must have the Application in its own language, all users need to experience the same look and feel of the Application.
In this case, you define the same Application for users in both locations and define the starting value of your
language variable. Use this variable as a filter in your database table, displaying strings in the right language. Usually, the criteria are simple relations, such asfield_name = variable_value .To set variable
language to starting value French, use the following syntax: "language" = "French"Note
Check for typing errors in variable names and values. Also, make sure to test your Application before you allow your user to log in. Your Application doesn't display an error if you assign values to non-existing variables.
If your variable name includes space, use double-quotes ("") to define your variable.
Note
You can set initial variable values for your Application Users via your authentication provider. When your Application Users log in with their Microsoft, Google, AzureAD, or any custom OpenIDConnect provider account, Loftware Cloud sets personalized variable values to Web Client. Contact Loftware to enter claim mappings into your Loftware Cloud database.
To enable setting variable values, use the following syntax in
Variable values :ApplicationVariable=$(Claim.ProvidedVariable)For example, the provider returns the claims
StoreandCountry. Your application uses variablesStoreIDandCountryID:StoreID=$(Claim.Store) CountryID=$(Claim.Country)
Enable use of non-published files in Document Storage allows you to permit your Application users to work with versions of label templates and Solutions that are not published (approved). By default, Applications only share label templates and Solutions that complete all your workflow steps and are marked as approved. Sharing non-published files can be useful as part of various testing scenarios.Click
Save .
Note
If you use Loftware Cloud product, after you save changes on the Applications page, your added users or groups receive an email with a link to your shared Application.
Using Applications in Control Center, under the
Updating and Removing Applications
You can always go back and reconfigure your
Go to
Applications and click on the Application you want to update.-
Change your settings and configure your
Application according to your needs. If you want to replace your label or Solution file, change thePath underSettings .
Click
Save .
To remove your Applications, select them from the