Batch File Printing
Description
This article describes how to perform batch file printing.
Note: Batch Print is no longer under support with notice posted on Loftware's web site: End-of-Support Notice for the Loftware Batch Print 32 Application, August 23, 2006 - August 31, 2007.
http://www.loftware.com/support/endofsupportnotice.cfm
How To Set Up Batch Printing
LPS has the ability to allow users to print labels in a batch file format. To do so, you create the batch file (the default is a comma delimited text file with a .bch extension) and put it into a specified directory to be scanned and printed by the LPS.
However, unlike other flat files, such as CSV, PAS, XML files, BCH files do not have as much control capability to define parameters, such predefining field names, or selecting the desired printer to print to. BCH files contain the basic information regarding the label to be printed, which is basically as follows;
!LabelName.LWL,1st field,2nd field,...,last field,Quantity,Duplicates,Pages
The above example is using examples only. When creating a batch file, the actual values need to be put in place.
The LableName.LWL needs to be an actual Loftware label filename. This does not need to be entered into the batch file. If not present, however, then the label file to be used must be specified on the command line.
The field values need to be the actual data to be represented in the field, not the name of the field itself. The order of these values should be entered in the order they are listed in the label definition, which is basically the order that the fields were added to the lable during creation in Loftware Label![]() A label is a design area on the computer screen where a label format is created or edited. Manager.
A label is a design area on the computer screen where a label format is created or edited. Manager.
The Quantity, Duplicates, and Pages values are all optional.
Notice how there is no place to enter the printer. The printer that will be used is defined in the actual scan directory set up to process batch files.
To set up LPS to process batch files, perform the following steps
- Create a directory on the LPS server that you will use to scan for batch files. You need to do this outside of the LPS software, such as in Windows Explorer, or Linux. This directory will be added to the LPS Scan Path.
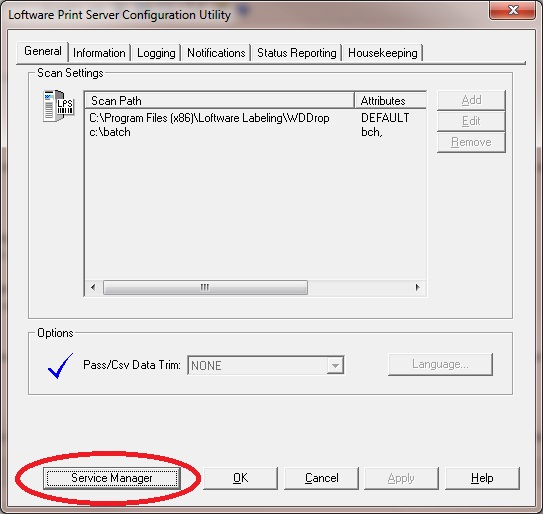
- Start the Loftware Print Server Configuration Utility - Start | All Programs | Loftware Labeling | Print Server | LPS Configuration.
- From the LPS Configuration window, click Service Manager. This will open up the Service Manager window.
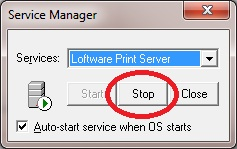
- If the Loftware Print Server is currently running, stop it by clicking Stop.
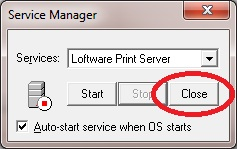
- Once the Loftware Print Server stops, click Close to close Service Manager.
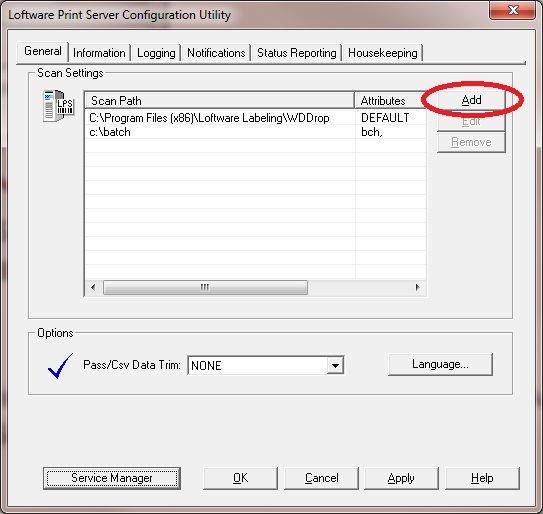
- In the LPS Configuration window, under the General tab, click the Add button. This will open up
the Directory Setup window.
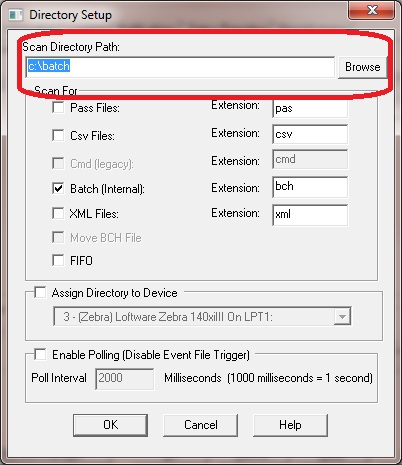
- In the Directory Setup window, enter the directory path you created in step 1.
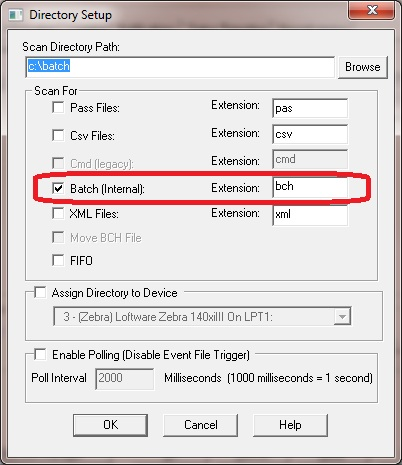
Note: The Extension defaults to BCH, but if you wish, you can save the batch files using any Extension, as long as that Extension is defined here. - Under the Scan For area, make sure the Batch (Internal): is selected.
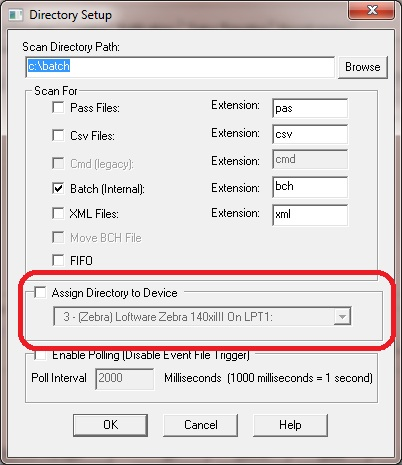
- Under the Assign Directory to Device area, select a printer, and select Assign Directory to Device. This will be the printer used to print the batch files placed into this directory.
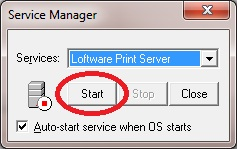
- Open Service Manager and restart the Loftware Print Server.
Now to print a batch file, take the previously generated batch file, in the proper configuration as described above, and copy it into the batch file scan directory defined in the above steps. The LPS will pick up the batch file, and print it using the printer defined for the batch scan directory.
Article Number
2012007
Versions
LPS, all versions
Environment
All supported installation environments.
