How To Use Zebra Printer Real Time Clock
Description
This procedure describes how to configure a label field to print the value supplied from a Zebra printer with a Real Time Clock (RTC).
How to use a Zebra printer RTC
Configure the Printer
These steps are only necessary if you need to adjust the clock setting on the printer.
- In Design 32, click File> Devices to access the LLM Device Configuration grid.
- Click the target Zebra printer device record.
- Click Options.
- Locate the Real Time Clock controls and click Set Date/Time.
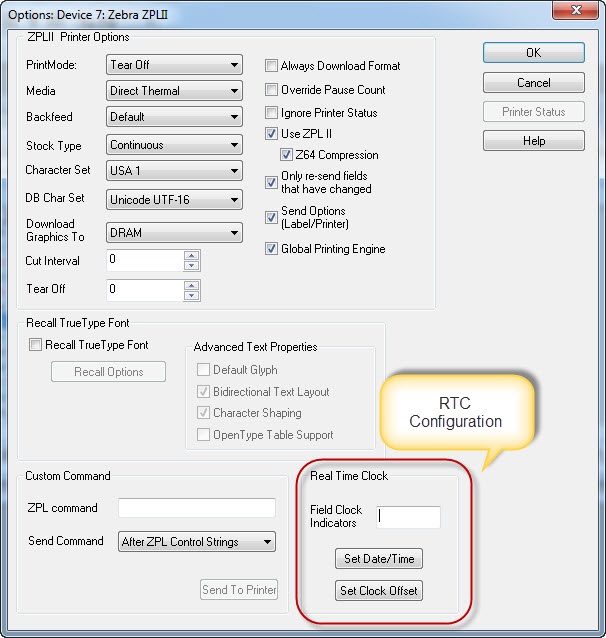
- Set the date/time variables as needed, and then click Send To Printer.

- Verify that no error is returned in the displayed response message.
Configure the Label
- Create/open a label designed for the target Zebra printer.
- Create a field named ZTimeFieldxxx, where xxx is any designator.
- Set the Font Category property for the ZTimeFieldxxx field to Native Fonts.
Note: True Type fonts do not work. - Define your RTC Field Clock Indicator. This is set to % by default and any symbol can be used with the exception of ~,^ since they are ZPL control characters.
- Open the field, set it to Fixed Text, and then enter the following format (see Table below for a complete list of Command Characters):
%A, %B %d, %Y %I:%M:%S %p
This returns a result similar to the following:
Wednesday, November 19, 2008 10:32:20 AM
Note: This is just the basics for information on setting offsets, a list of supported models and firmware, etc refer to the ZPL Programming Guide Real Time Clock section (pg 999).
----------------------------------------------------------------------------------------
http://www.zebra.com/id/zebra/na/en/documentlibrary/manuals/en/zpl_II_program_guide_en.File.tmp/P1012728-004.pdf
http://www.zebra.com/id/zebra/na/en/documentlibrary/manuals/en/zpl_II_program_guide_en.File.tmp/P1012728-004.pdf
----------------------------------------------------------------------------------------
Command Characters:
%a is replaced by the abbreviated weekday name
%A is replaced by the weekday name
%b is replaced by the abbreviated month name
%B is replaced by the month name
%d is replaced by the day of the month number, 01 to 31
%H is replaced by the hour of the day (military), 00 to 23
%I is replaced by the hour of the day (civilian), 01 to 12
%j is replaced by the day of the year, 001 to 366
%m is replaced by the month number, 01 to 12
%Mis replaced by the minute, 00 to 59
%p is replaced by the AM or PM designation
%S is replaced by the seconds, 00 to 59
%U is replaced by the week# of the year, 00 to 53, Sunday is 1st day*
%W is replaced by the week# of the year, 00 to 53, Monday is 1st day**
%w is replaced by the day# of the week, 00 (Sunday) to 06 (Saturday)
%y is replaced by the 2 digits of the year, 00 to 99
%Y is replaced by the full 4 digit year number—where% is the specified
clock-indicator character
*. %U establishes Sunday as the first day of the year.
**.%W establishes Monday as the first day of the year.
Article Number
2017098
Versions
LLM 9.x and above
Environment
Any supported LPS Family product environment with a Zebra printer