How to Use Loftware's Enhanced Zebra Font Recall
This articles describes how to use Loftware's Enhanced Zebra Font Recall.
To download fonts to Zebra printers please refer to the directions from Zebra;
https://km.zebra.com/kb/index?page=content&id=SO7891&actp=LIST_POPULAR
For more detailed information on Loftware's Recall TrueType Font option please refer to the Loftware LabelManager User's Guide, version 10.1.2 or higher.
Loftware's Recall True Type Font Option
Zebra printers that use the ZPLII language can take advantage of Loftware's Recall True Type Font option to improve printing speed and reduce network bandwidth.
By replacing the True Type Font specified for the label with a font that is already available in memory on the Zebra printer, print jobs are smaller, faster, and do not overburden the network with the large amount of data required for transferring TrueType images.
Enhanced Zebra Font Recall Option
The Zebra printer drivers have been enhanced to allow for the usage of TrueType Fonts (TTFs) that are stored on Zebra printers.
This feature allows the user to create and modify a label using TTFs within the Design application, while also taking advantage of native printing capabilities using the TTFs that are downloaded and reside on a Zebra ZPL II Printer.
Two new fields were added to the Printer Specific Options (PSO) screen:
- Recall TrueType Font checkbox
Checking this box turns on the Recall option, which is normally set to off by default.
- Recall Options button
The Recall Options button is activated and available when the Recall TrueType Font checkbox is selected. Clicking the Recall Options button opens a dialog box where you can define any
TrueType Font you wish to recall and specify the location of the substitute font that resides on the Zebra printer.
Navigating to the TrueType Font Recall dialog
The Recall TrueType Font option is set from the Options dialog for the specified printer (Device).
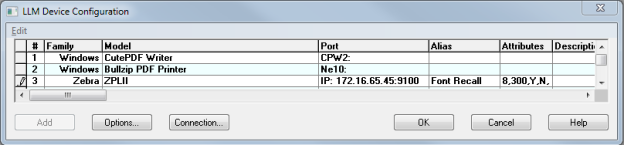
1. From the File menu, navigate to Devices, then select the Zebra ZPLII printer you want to configure.
2. Double-click or select the Options button to display the Options dialog.
3. To enable the option, go to the Recall TrueType Font area of the dialog, and make sure that Recall TrueType Font box is checked.
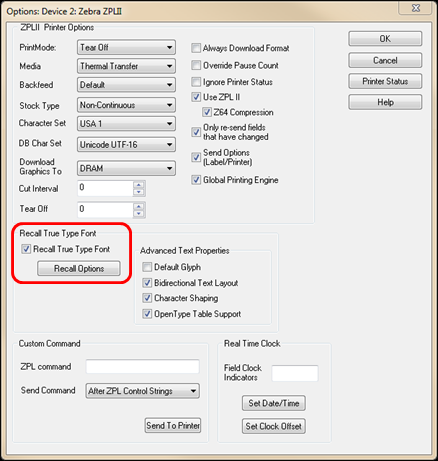
4. Use the Recall Options button to display the TrueType Font Recall Options dialog.
5. From this dialog, you can Add Recall Fonts to automatically replace the original TrueType fonts specified for a label. You can also Update or Delete existing Recall Fonts that you have previously configured.
Notes:
Use a naming convention that allows you to easily identify the Recall Font, and any variations of that font. For example: Arial-1R, then Arial-2RBold if you required an additional recall Arial font, only in bold. Face Name, Memory, and Recall Name are required fields.
Adding TrueType Recall Fonts
1. From the Options: Device dialog, navigate to the TrueType Font Recall Options dialog.
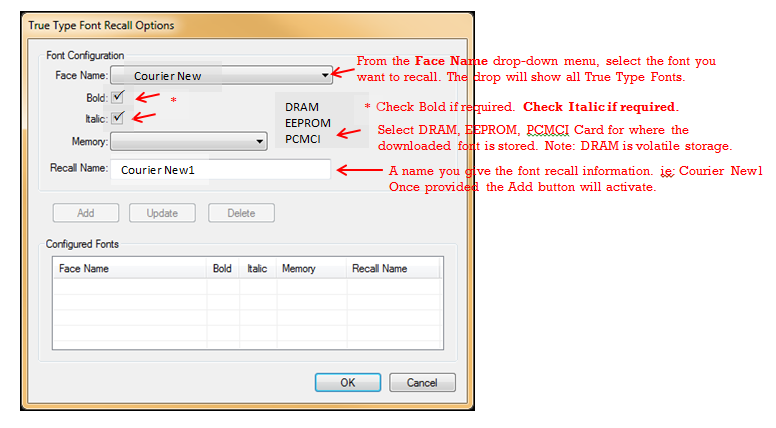
2. From the Face Name drop-down menu, select the font you want to recall.
3. If the font needs to be altered to Bold or Italic, check the appropriate box.
4. From the Memory drop-down menu, select the printer memory type where the local fonts are stored.
5. Create a Recall Name to associate with this recall font.
6. Click the Add button to create the Recall Font.
7. Click the OK button to confirm your new font and return to the Options: Device dialog.
Updating or Adding New Fonts from Existing Ones
1. From the Options: Device dialog, navigate to the TrueType Font Recall Options dialog.
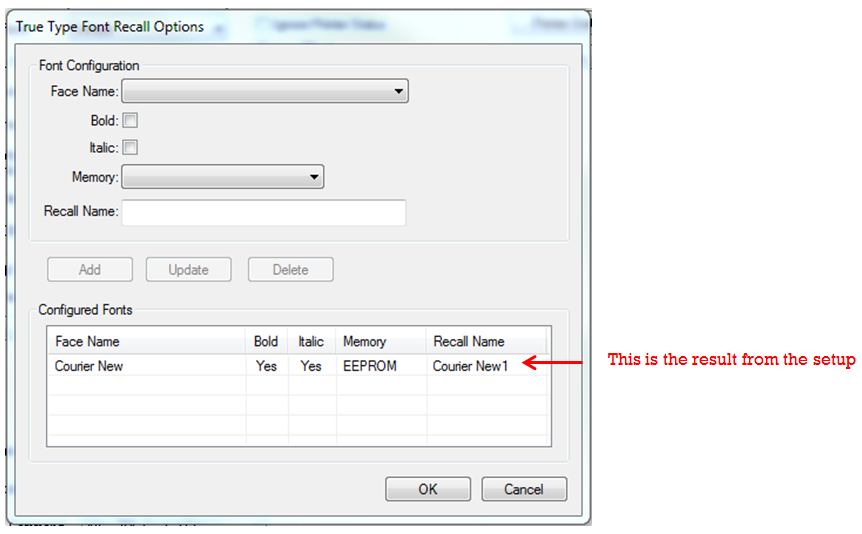
2. From the Configured Fonts area, select the existing Recall Font you want to update. Once selected, the fields should populate with the font information.
3. Make the changes (updates) to any of the following fields:
- Bold, Italic, Memory can be changed to update an existing Recall Font.
- Recall Name can be changed when you want to add a new font based on an existing one.
4. Click the Update button to update an existing Recall Font, or the Add button to create a new Recall Font.
5. Click the OK button to confirm your new font and return to the Options: Device dialog.
Caution: If you are updating a Recall Font and you change the Face Name, the old name will be replaced and no longer recognized as a Recall Font.
Deleting Fonts
1. From the Options: Device dialog, navigate to the TrueType Font Recall Options dialog.
2. From the Configured Fonts area, select the existing Recall Font you want to Delete. Once selected, the fields should populate with the font information.
3. Click the Delete button to Delete an existing Recall Font.
4. Click the OK button to confirm your deletion and return to the Options:Device dialog.
Article Number
2015019
Versions
All LLM/LPS versions 10.1.2 or higher
Environment
All supported installation environments