A blank page is inserted between printed labels when a PCL driver is connected to a Generic / Text Only Windows printer
Problem
Printing using Loftware's Native PCL driver with a Print Manager/Spooling Connection to a Generic / Text Only Windows printer may result in a blank page between each printed label. (A Generic / Text Only Windows printer is a printer connection created in Devices and Printers in a Windows Server or Windows operating system. It uses the printer driver Manufacturer: Generic, Model: Generic / Text Only).
Note This issue is dependent on the operating system version that is used on the Loftware Print Server. This issue may occur only with newer operating systems such as Windows Server 2012 R2 and later or Windows 10 and later.
Explanation
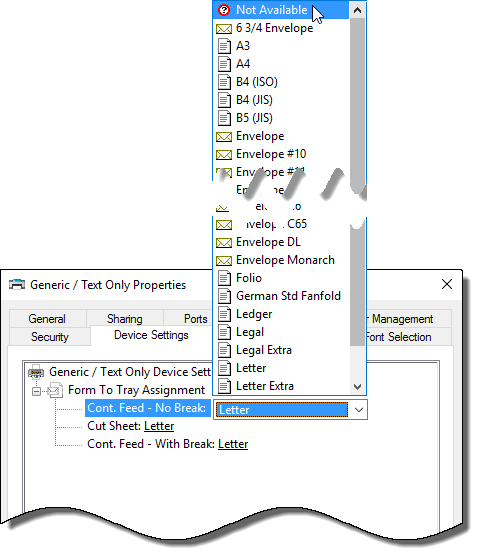
This behavior may occur only on certain Windows Server and Windows operating systems. In Windows Server 2012 R2 and Windows 10.1, by default the Cont. Feed - No Break printer property is set to Letter which enforces an invisible margin. If anything is set to print within that invisible margin, the driver attempts to print a second page. If the Cont. Feed - No Break property is set to Not Available, the driver does not enforce the invisible margin.
Solution
To resolve this behavior so that the printer driver does not enforce the invisible margin and does allow information to be printed in that area without creating a blank page, in the operating system on the Loftware Print Server change the Cont. Feed - No Break property of the Generic / Text Only printer from Letter to Not Available.
To make this change in your Loftware Print Server (LPS) environment, do the following.
- Open the Devices and Printers window.
- Right click the Generic / Text Only printer you are having an issue with, and select Printer properties.

- In the Generic / Text Only Properties dialog box, click the Device Settings tab.
- In the Device Settings tab, expand Form to Tray Assignment if it is not already expanded and find the Cont. Feed - No Break setting. Note that it is set to Letter, meaning that it enforces the invisible margin and prints an extra blank page between each label.
- To change this setting, click the drop down arrow next to the word Letter and scroll all the way up to the top and select Not Available.
- Select Apply, and then click OK to close the dialog box.
The printer driver no longer enforces the invisible margin, and it allows information to be printed in that area without creating a blank page.
Article Number
2017018
Versions
All supported LPS family product versions.
Environment
Windows Server 2012 R2 and later and Windows 10.1 and later