How to Encode Special Characters in a Code 128 Barcode When Using Windows Driver
Description
When using a Windows driver in combination with a Code 128![]() A versatile, variable length symbology that can encode all 128 ASCII characters through the use of 106 unique character patterns. barcode symbology, you are unable to scan special characters such as SHIFT(), or HT(), or SO() or CR() after printing the label. The barcode will print, but special characters, such as carriage returns, will not scan correctly.
A versatile, variable length symbology that can encode all 128 ASCII characters through the use of 106 unique character patterns. barcode symbology, you are unable to scan special characters such as SHIFT(), or HT(), or SO() or CR() after printing the label. The barcode will print, but special characters, such as carriage returns, will not scan correctly.
Cause
There is a setting required called "encodePlusA" that must be enabled for this to work.
Examples of possible formulas that will not work unless you have the encodePlusA option turned on:
- Code 128 barcode using a Formula datasource with the following text = SHIFT() & HT() & HT() & SO() & CR()
- Code 128 barcode using a Formula datasource with the following text = SHIFT() & HT() & SO()
- Code 128 barcode using a Formula datasource with the following text = CR()
How to use the encodePlusA option in LLMWDN32.ini file
You must edit the LLMWDN32.ini file in order for this to work. Follow these steps:
- Navigate to the LPS Configuration Utility and open it up.
- In the LPS configuration utility select Service Manager and then Stop the service.
(The service has to be stopped in order to edit the LLMWDN32.ini file.)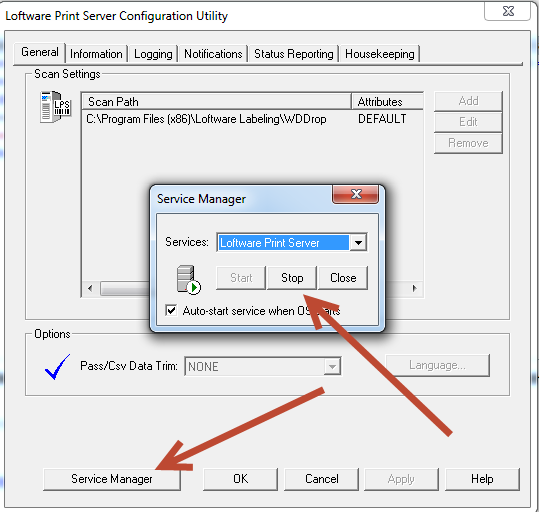
- Navigate to "C:\ProgramData\Loftware Inc\Labeling\Config", and find the LLMWDN32.ini file.
- Open the LLMWDN32.ini file in a text editor like Notepad++, ultraedit, or something similar.
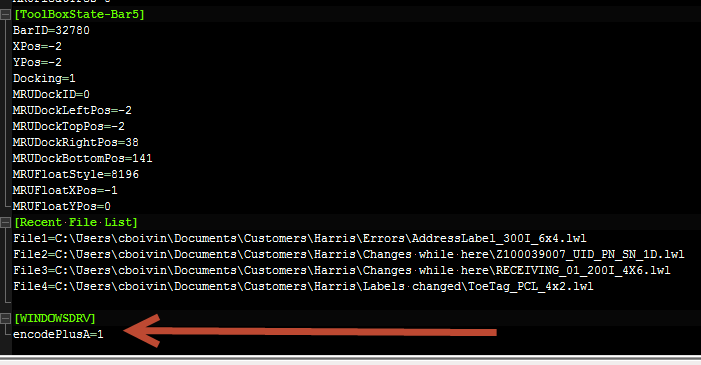
- Select "Ctrl F" to do a search for the following header: [WINDOWSDRV]
- If [WINDOWSDRV] section already exist, then enter just add the following line:
encodePlusA=1 - If [WINDOWSDRV] section does not exist then move to the bottom of the file and add the following:
[WINDOWSDRV]
encodePlusA=1
*For this to work it must be typed exactly as it appears in this article: encodePlusA=1 encodePlusA parameters: 1 = Enabled or 0 = diasabled
- If [WINDOWSDRV] section already exist, then enter just add the following line:
- Save the LLMWDN32.ini file.
- Once the file has been saved go back to the LPS configuration Utility and start the Loftware Print service back up.
Then click OK to close the Loftware configuration utility.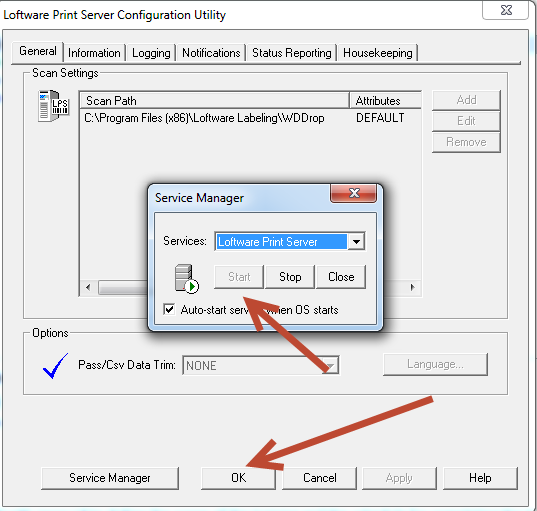
Reminder
When you stop the Loftware Print Service, printing will also stop until the service is started back up. Any time you need to make a change to the LLMWD32.ini, the Loftware Print Service needs to be stopped and then restarted for the change to take affect.
Article Number
2015037
Versions
All LPS versions.
Environment
All supported installation environments.