 Use the Barcode Wizard to Add a Barcode
You can use the Barcode Wizard to create a barcode field and supporting Formula data sources![]() A mathematical or logical statement that acts as a data source and can serve as the data ref for a document field. A formula data source can be used to concatenate strings, perform mathematical operations on numbers or perform string operations on text. and add them to the label template, layer object, or reusable object that you are editing. The Barcode Wizard guides you through the configuration of a barcode, allowing you to select common element strings
A mathematical or logical statement that acts as a data source and can serve as the data ref for a document field. A formula data source can be used to concatenate strings, perform mathematical operations on numbers or perform string operations on text. and add them to the label template, layer object, or reusable object that you are editing. The Barcode Wizard guides you through the configuration of a barcode, allowing you to select common element strings![]() In the Barcode Wizard, a description of a segment of the barcode data. to incorporate into the formula for the barcode's data. After you have exited the wizard, you can make any further changes to the barcode by using the Properties and Data Sources panes.
In the Barcode Wizard, a description of a segment of the barcode data. to incorporate into the formula for the barcode's data. After you have exited the wizard, you can make any further changes to the barcode by using the Properties and Data Sources panes.
Note: A Name, Data Ref, or Input Data Ref can include letters and numbers. Additionally, the following characters are permitted but cannot begin the name: hyphens, underscores, and periods.
Add a Barcode
To use the Barcode Wizard to create a barcode field and supporting Formula data sources and add them to a label template or other object, use this procedure.
- Save the label template or other object in which you want to add a barcode.
- In Label Design

 to open the Barcode Wizard.
 - In the Barcode Wizard, click Next.
- In the Select the Symbology dialog box, select the symbology or category of symbology for the barcode. If you select a category, additional drop-downs are displayed so that you can specify a symbology. After you have specified a symbology, a sample barcode is displayed. Click Next.
Note: If the symbology that you want to use is not listed, it is not supported by the Barcode Wizard. For information about how to add a barcode without using the Barcode Wizard, see Add a Barcode.

- In the Select Element Strings dialog box, for Field Name review the default name for the barcode field and edit it if needed.
- In the table, review the element strings to be included in the barcode data. Depending on the symbology, some element strings may already be included by default. If the Element Strings drop-down is disabled, then all required element strings have been included by default and no additional element strings are permitted. Otherwise, you can add and remove element strings as needed. The element strings are incorporated into the barcode data in the order shown.
- To add an element string, select the string in the Element Strings drop-down list and then click Add.
- To remove an element string, select the row in the table where it is displayed, and then click Remove.
- To rearrange the order of the element strings, click the row for an element string and then click Up or Down as needed to reposition it.
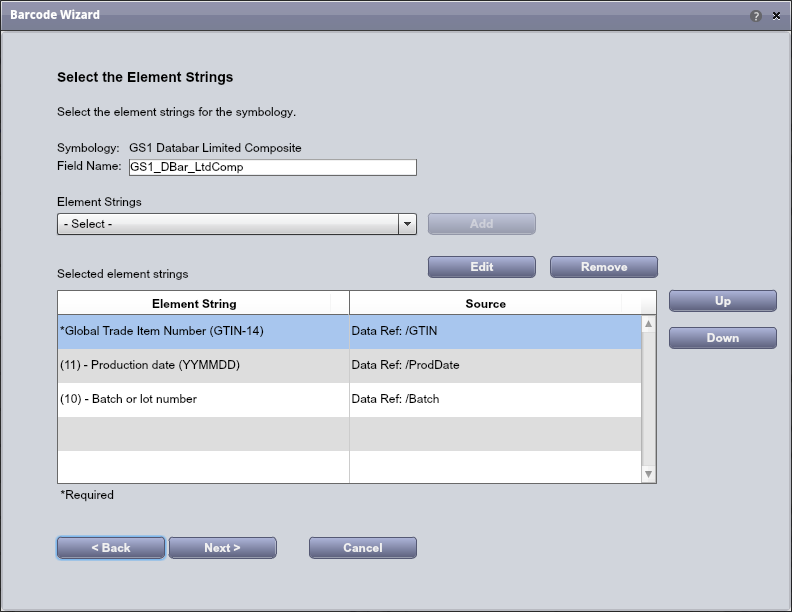
- In the table, review the source of the data for each element string, displayed in the Source column. For any element string for which you want to change the source of the data, do the following.
- To change the source of the data for an element string, select the row containing the element string and then click Edit.
- In the Edit the Element String Source dialog box, specify the source of the data for the element string.
Tip: If you want to return to the Select Element Strings dialog box without making any changes, click Back. If you want to exit the wizard without creating a barcode, click Cancel.
 To specify a reference to a dynamic source of data
To specify a reference to a dynamic source of data, select Data Ref and enter the fully-qualified path for a data ref in your Loftware Enterprise SP instance. You can create the barcode before the data exists, but before the label template or other object can be used to produce a label containing a barcode, you must ensure that the data ref points to the data that the barcode requires.
- If a Check Digit Included option is displayed, select it only if the data that will be provided includes a check digit. Otherwise, the check digit will be calculated at print time.
- If an Implied Decimal Position option is displayed, select an appropriate number of decimal places. Only values supported for that element string are displayed.
Click Next. In the Review the Element String Information dialog box, review the impact of your changes to the element string source and then click Next to return to the Select Element Strings dialog box.
To enter static dataTo enter static data for the element string, select Fixed Data and enter the value.
- If a Check Digit Included option is displayed, select it only if the data that will be provided includes a check digit. Otherwise, the check digit will be calculated at print time.
- If an Implied Decimal Position option is displayed, select an appropriate number of decimal places. Only values supported for that element string are displayed.
Click Next. In the Review the Element String Information dialog box, review the impact of your changes to the element string source and then click Next to return to the Select Element Strings dialog box.
To separately define multiple components of the dataIf the Define Components option is displayed, then you have the option to separately define multiple components that will be combined to produce the data for the element string. To do so, click Define Components, and then click Next.
In the Edit the Element String Source Component dialog box, specify the source for the data for the component displayed. Click Next and repeat for each remaining component of the element string until you reach the Review the Element String Information dialog box.
Review the impact of your changes to the element string source and then click Next to return to the Select Element Strings dialog box.
- In the Select Element Strings dialog box, after you have finished editing the field name and the element strings, click Next to display the Barcode Wizard Summary.
- In the Barcode Wizard Summary dialog box, review the information about the barcode. If you want to make changes, click Back until you reach the dialog box that allows you to configure the property you want to change.
Tip: The values displayed in the summary are generated based on your selections in the wizard. If you want to customize these values beyond what the wizard allows, you can make changes to the barcode field properties and data sources in Label Design

- Click Finish to close the Barcode Wizard and add the barcode field and formulas to the label template or other object.
Make Changes After Closing the Wizard
If you want to review or change the barcode, the human readable text, or the formulas for either after you have closed the Barcode Wizard, do the following.
- To make changes to the barcode, click the barcode field and then configure its properties in the Properties pane.
Tip: The option selected for Design Data in the View tab controls what data is used in fields and areas when previewed, printed, or displayed in Label Design
For each field, the value specified in the Default Value property for that field., placeholder data For a Variable Text field, the series of digits 1234567890, repeated until the maximum number of characters allowed for the field is displayed. For a barcode field, a sample barcode that adheres to the specified properties. For an image field, a sample image. Whether placeholder data is used in Label Design is controlled by the selection for Design Data., or data from a live data set A collection of data (names and values) that was retrieved from a data source and is specific to a label template or a reusable object. A data set can be used to populate fields displayed in Label Design, in a preview, and when test printing. can be used. For more information, see Select Data to Display in Label Design. - To make changes to the human readable text field if one exists, click that text field and configure its properties in the Properties pane.
Tip: To align a barcode and a human readable text field relative to each other, select both fields and click one of the Align buttons in the toolbar or click Position > Align and then click an alignment. For more information, see "Align Fields with Each Other" in Resize and Position Fields and Areas in a Label Template.
- To review or make changes to the barcode formula or the human readable text formula, click the formula in the Data Sources pane.