Data Initialization
Data Initialization object is a panel for assigning values to variables that are used on the selected label that belongs to a solution.
Settings
Label selects the label that is going to be used with Data Initialization object.
Tip
If the label is not a part of the solution, it can be located using the Browse button. The label can also be defined dynamically using a connected Data source.
Place focus on Data Initialization when label changes: sets focus to the Data Initialization table when the selected label changes. This makes the table instantly editable.
Show selection of labels from the solution: adds a dropdown list that the enables the user to select a label from those that are included in the solution.
Tip
This dropdown list allows the user to change the active label that is going to be printed. If this option remains unchecked, select the label by setting the Label data source.
Table Initialization group enables selection of records in the connected database.
Note
A separate tab is added for each database table that is connected to a label.
Columns group sets the width of data initialization table and its Prompt, Value and Formatted value columns.
Auto-size: automatic column resizing.
Show fomatted value: makes the Formatted value column appear in the object table when the form is run.
Advanced
The Data Initialization object sets variable values for your solutions. Labels then print with these values.
Allow loading variable values: If you enable this option, you can load variable values from files stored on your computer after you run the form. Loftware automatically initializes the variables on your label or form with values from the selected file.
Files with variable values have ".defaults" or ".values" extensions. The two supported variable formats are:
XML:
<variables>
    <variable name="var1">variable1</variable>
    <variable name="var2">variable2</variable>
</variables>
name-value:
var1=variable1
var2=variable2
With the Allow loading variable values option enabled, the active form displays the Load... icon. Click Load... to locate and load variable values for your forms.
Note
Three rules apply to loading variable values on forms:
If the variable does not exist in the file, the original value remains unchanged on the printed label.
If the variable file contains variables that are not defined on the label, Loftware ignores these variables.
If a value from the variable file is not valid, the original variable value remains unchanged. Error message appears.
The Data Initialization object lists all variables used on labels in your solution by default. To exclude specific variables from the Data Initialization object, select Limit visibility of variables.
Names of variables to show: Type names of variables you wish to keep visible in the Data Initialization object. Separate names of multiple variables with commas.
Example
You want to limit variable visibility on sample labels.
Your sample GS1-128 label uses the following variables:
Product_name
SSCC (Serial Shipping Container Code)
Count of Trade Items
Best Before Date
Batch or Lot number
GTIN of Contained Trade Items
You decide to use the Data Initialization object to make only two variable values editable:
Product_name
Best Before Date
Create a new sample GS1-128 label.
Save the label as a solution file (.nsln). This allows you to start adding forms in the same document.
Add a new blank form.
Select the label in Data Initialization object Properties > Settings > Label.
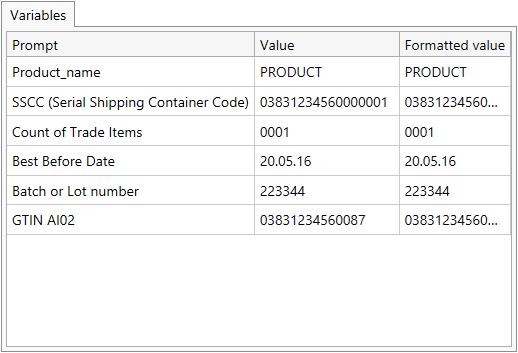
Data Initialization object lets you edit all label variable values by default:

To limit editing of variable values to only
Product_nameandBest Before Date, select Limit visibility of variables.Type variable names under Names of variables to show.

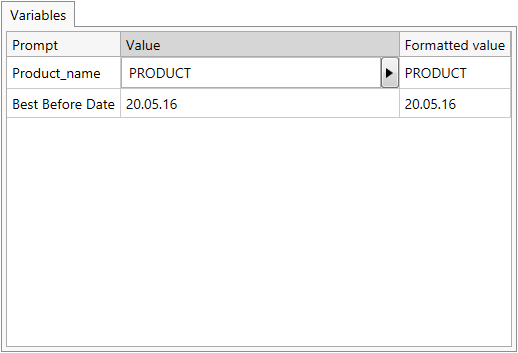
Run the form. Data Initialization object only shows variables
Product_nameandBest Before Date.
Style
Style tab defines visual appearance of an object.
Background color defines the object background color.
Transparent: transparent object background.
Font color defines the font and underline colors.
Font selects the typeface.
The font may appear Bold, Italic, Underlined or as a Strikethrough text.
Alignment defines horizontal positioning of the entered content.
Left: text aligned with the left object border.
Center: text positioned centrally.
Right: text aligned with the right object border.
Position
Position tab defines object positioning and its position-related behavior.
Position group defines the object position.
X and Y: anchoring point coordinates.
Width and Height: horizontal and vertical object dimension.
Keep aspect ratio: simultaneous changing of object dimensions while scaling.
Lock: prevents the object from being moved during the design process.
Size group sets how object's dimensions change when the form is running:
Resize anchor point: defines the fixed distance of an object from the form borders.
Tip
Choose the most appropriate anchor point to ensure the object's visibility regardless of the current window size.
Horizontally resize with form and Vertically resize with form: object size automatically adapts to the changing size of the form.
Horizontally resize with form: object width adapts to the resized form.
Vertically resize with form: object height adapts to the resized form.
Note
If both options are enabled, object width and height adapt to the resized form simultaneously.
Rotation angle group sets the object angle according to the design surface.
General
General tab defines the object and defines object settings for form startup.
Name sets a unique object ID. It is used for object referencing when defining functions, variables, scripts, etc.
Description allows adding notes and annotations for an object.
Hint helps the print form users by briefly explaining why or how to use the selected object.
Initial state on form setup group defines the object behavior while editing and printing a form:
Enabled: defines if the object is going to be active (editable) on the print form or not.
Visible: defines if the selected object is going to appear on the form or not.
Condition: an object is enabled and/or visible if the result of the given condition is "True".
Preparing Variable Values for Loftware Automation
In combination with Loftware Automation, Desktop Designer allows you to use the values from Data Initialization object to trigger automated label printing, and to define the content of printed labels.
To enable such use of values that you type into the Data Initialization object, you must configure your solution to:
Store the variable values from the Data Initialization object in a new dedicated variable.
Forward the stored content of this dedicated variable to Loftware Automation.
To make the variable values from your solution available for Loftware Automation:
Add a new variable to your solution.
Rename the added variable to
[YourDataInitializationObjectName]_VariableValues.[YourDataInitializationObjectName]is the name of your Data Initialization object.The variable contains values from the data initialization object in XML format.
Use the variable in Loftware Automation HTTP trigger.
Example
Use an object on your form (e.g. button) to create an HTTP request. When configuring the action in Desktop Designer, type in the variable name (
[YourDataInitializationObjectName]_VariableValues) under Content > Data:.When configuring the HTTP Server trigger in Automation Builder, enable the Save data received by the trigger to file option under Settings > Save Received Data. Define the file name and location (e.g.
.\tmp.txt).Deploy the Automation configuration. After the trigger fires, the variable values from your solution are saved in the specified file. The file content is:
<Variables>
<variable name="Variable1" >xx</variable>
<variable name="Variable2" >yy</variable>
</Variables>
Variables named
Variable 1andVariable 2belong to the label that is selected for your Data Initialization object.
Note
Values of internal and global variables cannot be stored in the XML file.