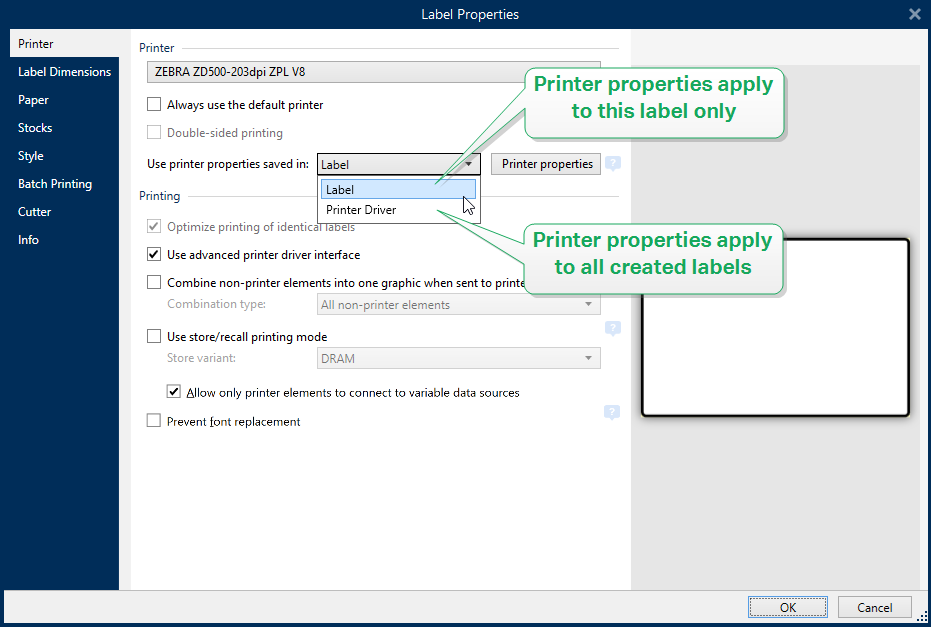
Printer
Printer tab lets you define the printer to print the labels on, and to set printing behavior.
Printer dropdown menu lets you select a printer from the currently available printers.
Tip
To set the printer settings, select a printer and click Printer properties. This button gives direct access to the selected printer's driver and its settings.
Note
For additional information on the installed printer drivers and their settings, see Printer Driver Installation Guide.
Always use the default printer: select the default system printer to be used for the current print job.
Double-sided printing: enables double-sided label printing.
Use printer properties saved in: This setting allows you to define where Loftware takes the printer settings from while printing. There are two options available:
Printer Driver: When printing, Loftware takes the printer properties that you define in the printer driver. This means that all labels that share these settings print equally. E.g., if you change printing darkness in the printer driver dialog to 10, all labels print with darkness set to 10.
This is the default setting. With this setting selected, the Printer properties button becomes disabled. Access your printer properties from Windows system dialogs.
Label: When printing, Loftware takes the printer properties that you save in the label. This means that the way how this label prints is independent from how you configure the printer driver. E.g., if you change the darkness for the label to 10, only this label prints with darkness set to 10.

Read more about how to manage printer settings in the knowledge base article Defining default printer settings for all users (including network users).
Example: for settings saved in printer driver
The ribbon in your printer is ending its life period. As a result, the quality of printed labels is decreasing. To enhance the quality before you receive a new ribbon, you must temporarily increase the printing darkness for all labels at once. Configure darkness level in your printer driver and all your label print with increased darkness.
Example: for settings saved in label
If you are designing a label on a remote computer that currently does not have access to your designated label printer, you can still design your label, save the printer properties within your label, and take this label to the computer that can access your label printer. The saved printer settings make your label "portable".
Use printer settings from the printer driver: select this option if you prefer printing using the printer driver settings.
Note
Specific printer models only allow you to set label dimensions using the printer driver dialog. Among these models are high resolution inkjet coding and marking systems. If you select such a printer model for your label, Desktop Designer automatically detects it and only allows you to take the label settings from the printer driver. Label dimension settings in the Label Properties dialog are disabled in this case too.
Use custom printer settings saved in the label: each label may have its own printer settings defined and saved by the user. Select this option to use custom settings while printing.
Printing group of settings optimizes the printing process.
Optimize printing of identical labels: if multiple identical labels are printed, the printer does not need to receive the label file each time. With this option enabled, the printer alone multiplies the print job.
Use advanced printer driver interface: speeds up label printing.
Tip
When selected, the optimized printer commands are in use. Deselected option disables printing optimization. Each label is sent to the printer in form of an image.
Combine non-printer elements into one graphic when sent to printer: merges multiple label objects into a single large graphic and sends it to a printer.
Tip
With disabled merging, Desktop Designer sends graphic items to a printer separately which might in rare occasions cause object positioning issues. Merged graphic items ensure correct rendering of the label. The downside of merging is increased amount of data which is sent to printer.
Use one of the below listed combination types to merge the graphics in the most suitable way.
Combination type: defines which label objects are merged for printing.
All non-printer elements: all label objects are merged into a single graphic item and sent to printer.
All non-printer elements except counters: label objects are merged and sent to printer as a single item with an exception. Counters are sent separately within the same print stream.
Only fixed non-printer elements: only label objects without variable content are merged into a single graphic file and sent to printer.
Tip
Non-printer elements are all items that are sent to printer as graphics. In opposite, internal printer elements are sent out as internal printer commands and rendered by the printer.
Note
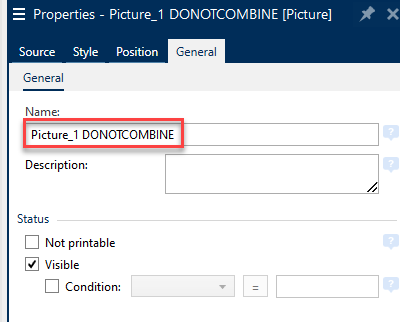
To exclude any label objects from combination, your object name or the name of the data source connected to your objects must include "DONOTCOMBINE":

Use store/recall printing mode: optimizes printing performance. With store/recall mode activated, Desktop Designer does not need to resend the complete label data for each printout. Instead, default labels (templates) are stored in the printer memory and the Desktop Designer only sends recall commands to complete the label content during the printing process. For more information, read Store/Recall Printing Mode.
Store variant: printer memory location to store the label templates.
Printer memory location: printer memory location to store the label templates.
Note
To make sure the stored label samples are not lost after power cycling the printer, store them at non-volatile locations. Read more about non-volatile memory here.
Allow only printer elements to connect to variable data sources. If you connect your data sources to objects that are not marked as internal printer objects, Desktop Designer informs you with an error message and you also cannot print your label. This prevents variable data print errors in the store/recall printing mode.
Prevent font replacement: In case of missing fonts for textual label objects, Loftware applications Automatic Font Replacement and print the labels using fonts that are similar to the missing ones.
There are two reasons for missing label fonts:
The font is not installed on the system. This may happen if you design labels on one computer, and print labels on another computer that does not have these fonts installed.
Font is not stored in printer memory. This may happen if you design labels for one printer, and print the labels using another printer that does not store these fonts.
Automatic font replacement can significantly change text layout and, as a consequence, the entire label design. If you want to prevent the printing of altered labels, enable the Prevent font replacement option. This option stops label printing if there is a need to replace the missing label fonts.
Prevent font replacement option stops printing if the labels are in print mode. This is when you are no longer editing labels in Loftware, but you are printing the labels using:
Loftware Print application.
Print Label action in Loftware Automation configurations.
Print Label action in Create or Edit a Form
Loftware Web Client.
Loftware.NET API .
When designing and printing labels directly from Loftware with Prevent font replacement option enabled:
Printing continues if you print a label that you previously opened in Desktop Designer. Upon opening a label, Desktop Designer automatically replaces the missing font.
Printing stops if you use Print Pane (Default Printing Form) to change the current printer to a device that has no matching fonts installed.