Connecting Zebra cloud printers
Connect your Zebra printer to Control Center to use Cloud Print Cloud Print API. Loftware Developer Portal gives you APIs to:
Send print stream data directly to your printers.
Print labels you save in document storage in Control Center.
Store labels you save in document storage in Control Center on your printer.
To connect your printers to Loftware Cloud, complete the following steps (Details below):
Prepare your connection: register your printer on Control Center.
Connect to Loftware Cloud: configure your printer hardware.
Complete your connection: complete your printer registration on Control Center.
Preparing your Control Center connection:
In Control Center, go to Printers > Cloud printers and click Add.
Type your printer name (this name identifies your printer in Control Center).
Note
Using spaces or special characters (&,%,?,*,...) in your printer names may cause errors. Use alphanumerical characters (A-Z, a-z, 0-9, and "_" instead of spaces) if possible.
Remember your printer name to use later in the connection process.
Select your printer model from the list.
Copy your Server URL (under Cloud Printer settings in Control Center).
Preparing your Loftware Cloud connection:
Note
You can use any TCP/IP client, but we recommend using PuTTY or Zebra Setup Utilities (ZSU).
If you decide to use PuTTY, you can download only putty.exe, (the SSH and Telnet client).
Turn on your printer and connect it to the internet.
Use the same local network as your printer.
Open your TCP/IP client to register your printer with Loftware Cloud's print service.
Configure your TCP/IP client:

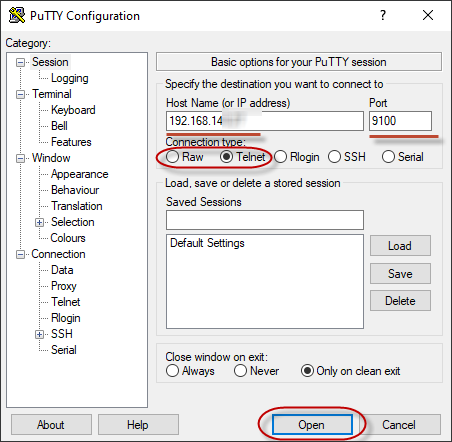
Type your printer's local IP address.
Use default port 9100 (or type the port you set).
(PuTTY only) Select Telnet or Raw for your connection type.
Establish your TCP/IP connection to your Zebra printer (on PuTTY, click Open).
Once you establish your TCP/IP connection, you are ready to send SGD commands.
Connecting to Loftware Cloud with SGD commands:
Note
Each command starts with: ! U1.
Note
If you don't use PuTTY, end your commands with <CR><LF> to be accepted by your printer.
Set your server URL. In your command terminal, send the following (Replace "Your Server URL" with the Server URL you copy from Control Center):
! U1 setvar "weblink.ip.conn1.location" "Your Server URL"Check that your printer accepts your Cloud Print Server URL. Your printer must return the address you send. Send:
! U1 getvar "weblink.ip.conn1.location"Reset your printer to apply your settings. Send:
! U1 setvar "device.reset" ""Get your printer's serial number (Required by Control Center):
! U1 getvar "device.unique_id"Copy your printer's serial number to complete your printer registration on Control Center > Cloud Printers
Completing registration on Control Center:
Paste your printer's serial number.
Click Save.
Control Center opens a dialogue. You added your printer on Control Center, but it is not connected yet. Control Center lists your printer in the Cloud printers section with the status: Pending connection.
Click Save.
Wait 1 minute and refresh your page. Control Center lists your printer in the Cloud printers section with the status: Connected.
Your Zebra printer is connected and ready to use.
To interact with your printer connected to Cloud Print, read Cloud Print API.