Rectangle
Use rectangles to frame objects (for example, texts, pictures, or QR codes) on your labels. Rectangles also act as borders on your labels. Organize your data and label designs with rectangles of different sizes and thicknesses to improve the overall look of your label design.
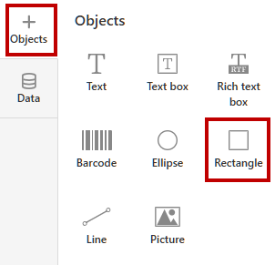
Adding rectangles to labels
To add a rectangle to your label design:
Click the Rectangle icon in your Objects panel.
Click on your label design surface to place your rectangle on your design surface.
To move your rectangle, click and drag the Rectangle object.
To resize your rectangle, drag the corners of your Rectangle object.
To rotate your rectangle, drag the small circle symbol above your Rectangle object. You can rotate your rectangle by 90, 180, or 270 degrees.
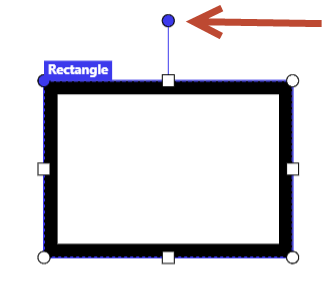
You can also rotate your rectangle by any degree in the Rectangle Properties panel.
Rectangle properties
To set or edit your rectangle properties, click on your rectangle object. The
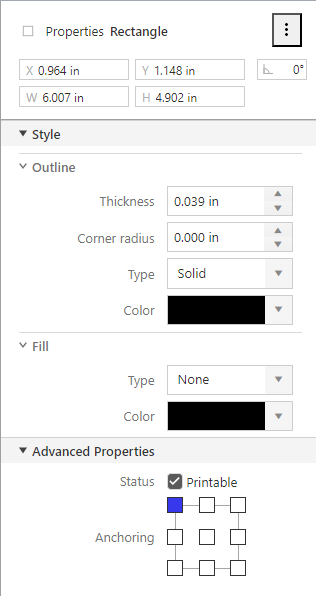
You can manually define your rectangles' dimensions, position, and rotation data. You can rotate your rectangles by any degree.
Outline :Thickness : You can define rectangle thickness by typing values or using the cursor icons. With cursor icons, you increase or decrease thickness by 0.05mm. Use values larger than 0.08mm. Maximum thickness is limited by half of the smallest between rectangle width and height.Corner radius : Makes the rectangle corners round. Higher values make the curves broader. You can type values or use the cursor icons. With cursor icons, you increase or decrease the corner radius by 0.05mm steps.Type : You can choose betweenSolid ,Dash , andDot rectangle line types.Color : You can select your rectangle color if your printer enables color printing.
Fill :Type : You can fill your rectangle with different saturation levels of the selected color. If you select values other thanNone , the content within the rectangle (images, barcodes, texts) will not be visible anymore.Color : You can select your fill color if your printer enables color printing.Note
Print your test label when you set the
Fill option other thanNone . Your printout might look different than your label design preview.To test your printouts, try different
Graphic Options (Dithering values) in your Loftware driver settings >Printer Settings .- On the computer where Loftware driver is installed, open Windows
Settings , then go toPrinters & scanners . - Click your printer, then click
Manage to open Loftware printer driver settings. - Click
Printing preferences to open thePrinter Settings window. - Go to the
Graphic Options tab and adjust theDithering option.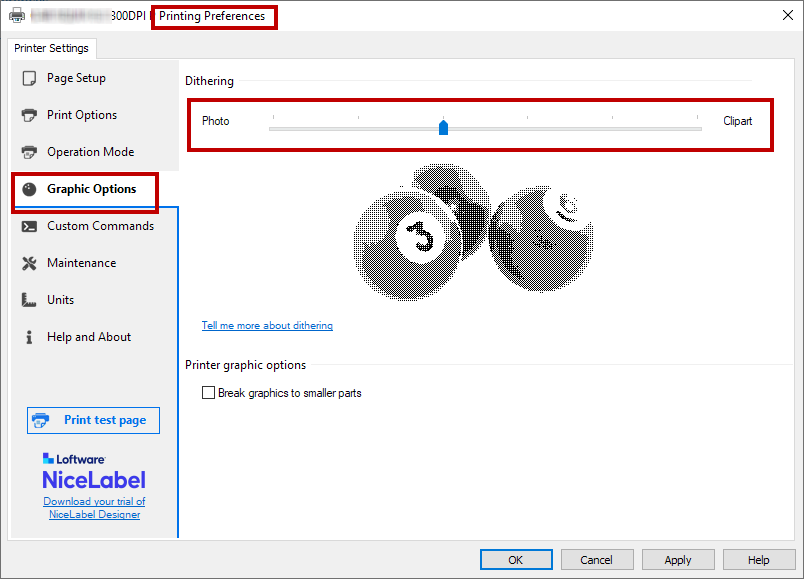
Print test labels with different levels of dithering.
- On the computer where Loftware driver is installed, open Windows
By default, label objects have the status
Anchoring: Anchoring point is the spot where your label object is pinned to the design surface. Variable size objects (variable text, barcodes) increase or decrease their size in the opposite direction of the anchoring point.
Note
Web Designer remembers your rectangle line thickness and radius, so when you place another rectangle on your label, its properties are the same as those on your previous rectangle.
Use the right-click menu or keyboard shortcuts to:
Copy
Cut
Paste
Delete